

It's time for the MFT Creative Chat. The My Favorite Things Design Team Creative Chat is a monthly feature, where we are challenged to explore our creative spaces and share valuable organizational methods, tools, and shopping strategies with you. You'll be able to peek into our creative spaces, ask questions, and share your own ideas in the MFT forum. This month, we were challenged with the following:
- Show us your creative mind at work. Take us on a journey through a card-making session, start to finish.
- How do you select colors, layout, embellishments, and overall design?
- Share your creative process with us.
Visit Kim's Blog for a full list of designers that have taken up the challenge and get ready to delve into the minds of our creative team.
Soooooooo, are you ready to delve into the depths of my stamping mind?!? It can be a scary place sometimes! LOL!!
I created a video to help you get a feel for how I work, but I also did a photo tutorial for those who prefer photos. Click HERE to watch my video on YouTube.
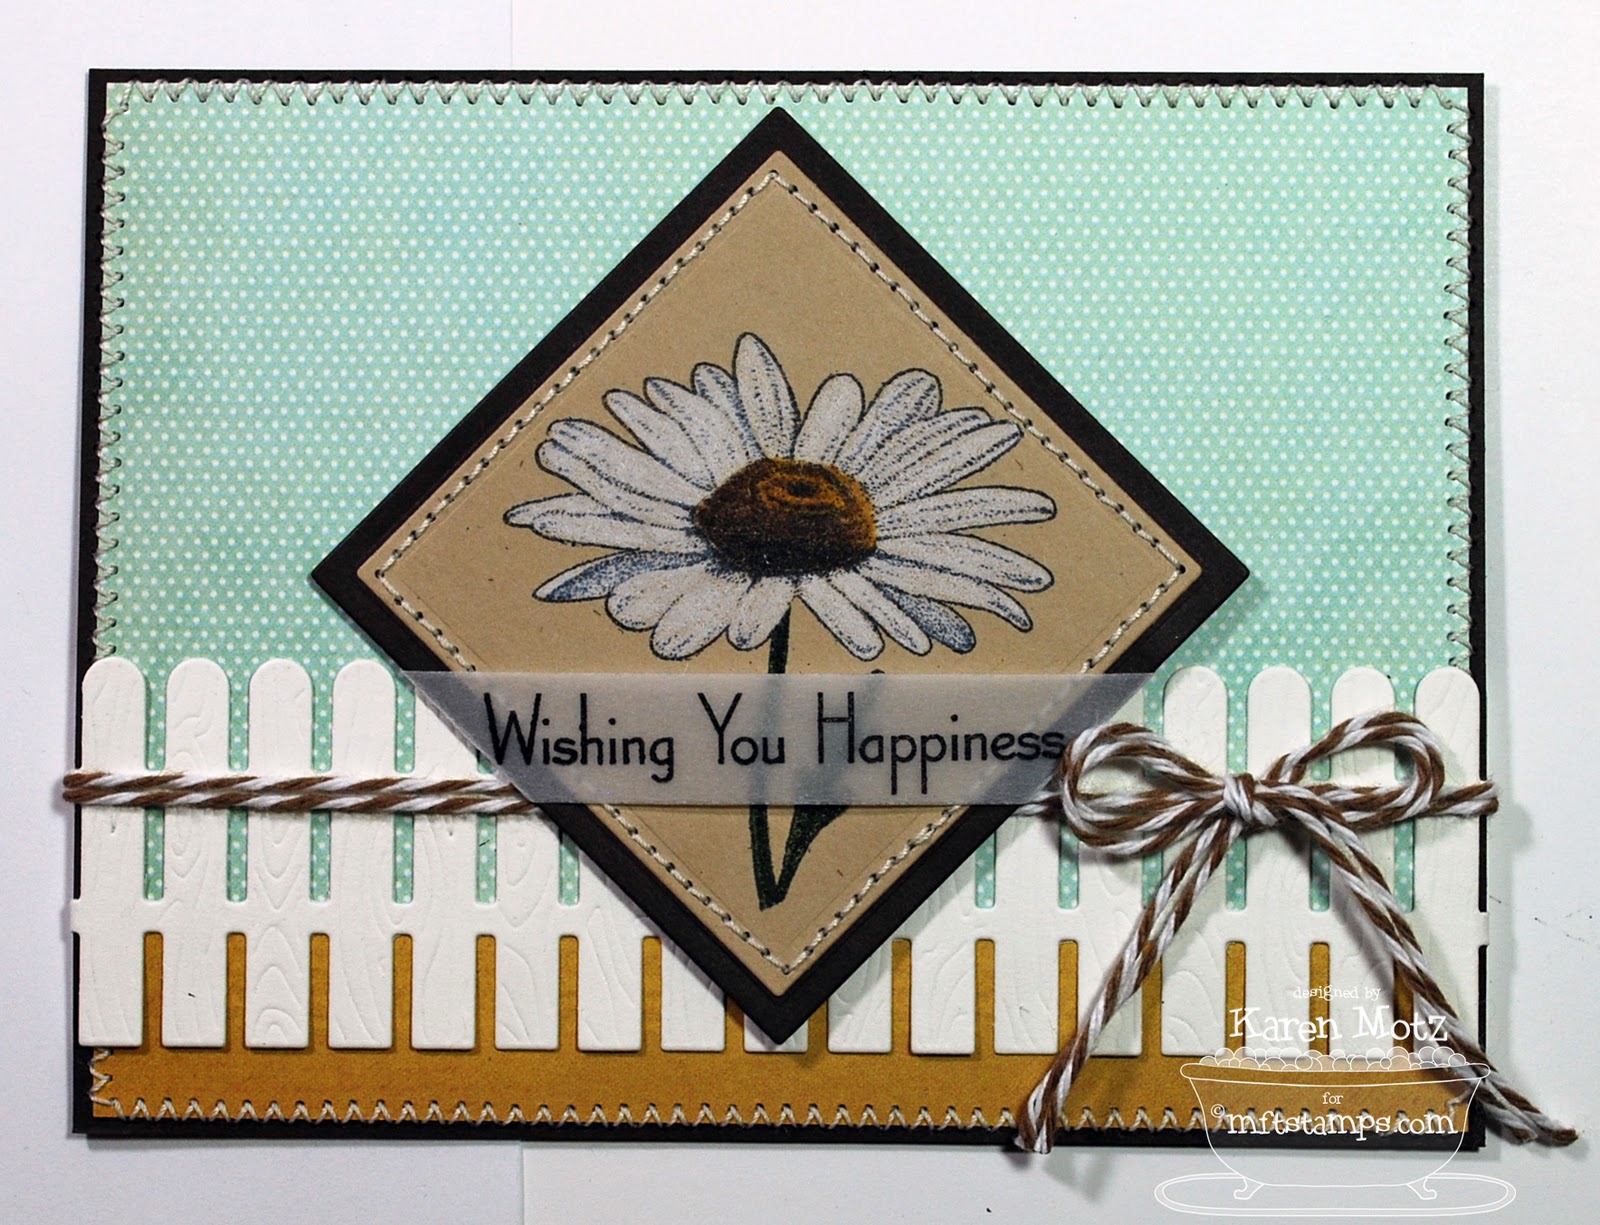
I made this gorgeous card using Inspired by Flowers 2 and I started out with the Card Patterns Sketch #150 for the layout. By the way, MFT is sponsoring this sketch over on the Card Patterns blog so hop over there later to play along.
Pin It

Here's a detail shot:

Photo Tutorial:

Next I chose the patterned papers. I decided to use My Mind's Eye Lost & Found Two Sunshine for this card because I think the blues and yellows worked well with the daisy image. I decided to stamp the image onto kraft card stock instead of white or cream because I wanted to use coloured pencils to colour the flower. Also, I thought the kraft card stock coordinated nicely with the patterned papers. I chose the blue polka dot patterned paper for the background...it reminds me of the sky. I layered the image onto a square of hot fudge card stock to make it pop against the blue.

Next I started working on the layers on the bottom half of the sketch. The striped lines on the sketch reminded me of a fence so I used my woodgrain fence Die-namics die to cut the fence from whip cream card stock.

Next I assembled the base layers and I added a strip of yellow patterned paper along the bottom edge then stitched the layers onto some hot fudge card stock using a zig zag stitch. I thought some cappuccino twine would make a nice accent along the fence, tied in a bow. Also, I wanted to add a sentiment so I cut out a piece of vellum using the narrow banner from the first place award ribbon Die-namics and stamped the sentiment with black staz-on ink. I envisioned the banner placed across the stem and leaf of the flower.

Once I had the twine on the card I realized the banner sentiment just wasn't going to work, so instead I wrapped the ends of the banner around the back of the image panel and created a wrapped sentiment instead of a banner. Things evolved as I created and I had to change my vision, but I think that's half the fun of creating. I added some Jody boosters on the back of the image panel to give it a little dimension.

And here's the finished card front. I just have to add a kraft card base and I'm all done!
Voilà!
Here are the Die-namics I used:


Thanks for stopping by!
Karen


13 comments:
fancy name on your video! OH and the heirloom table looks awesome in the back ground.
Your card is really lovely I can't believe you didn't use copics. The pencils were perfect for this card
good thing all the ideas in your mind worked out my friend because I know it can be a scary place ;)
Love the pencils on the kraft! Oh yum! You aren't so scary after all ;) Your card is just gorgeous! Love the fence with the twine!
Love the video, Karen, and thanks for sharing your process. Your card is gorgeous!! Love the colour pencils on kraft, it's a stunning image!
Loved viewing your video and your creative process. Loved the white flower on kraft too :)
Oh Karen...this is stunning!!! LOVE white on Kraft. and that twine and picket fence are just perfect!!!
Great card! Thank you for sharing your process.
Whow thanks so much for sharing your process with us ...always turns out a winning creation....love your work!
Since we think a lot alike, I prefer to NOT think it's so scary, LOL! And yes, it IS a gorgeous card!
It is SO wonderful to hear your voice girlie!!! This card is GORGEOUS and I LOVE your system!!
Beautiful card,Karen!! Loved the peek into your process!!
I'm stuck at the airport, delayed flight. Thank goodness for my IPad. Love the coloring on your daisy Karen. The petals and center look so real. Cute, cute card.
Outstanding! You know I love a video tutorial!! I love how you started to make the sentiment banner and then showed us how you changed it to wrap around ‘cause you liked that better! And that center of the daisy? It looks 3D! You are a STAR – no wonder your name blew across the screen with all that fairy dust!!
beautiful card-the coloring & stitching are lovely! thanks for sharing an awesome video of your creative process!!
Post a Comment