It's time for this week's Sweet Sunday Sketch Challenge, SSSC139.
After last week's sketch, this one seemed like a complete breeze! I got back on the Christmas card wagon for this week's sketch and pulled out my new Snow à la carte stamp from Taylored Expressions. This is definitely a perfect stamp for whipping up quick and easy cards. This is card #24 for Project Christmas 2011.
The image is stamped with Memento Tuxedo Black onto Choice Buttercream and coloured with copics. I added sparkle to the letters with my red Spica glitter pen.
The patterned paper is from the Season's Greetings 6x6 pad by Echo Park. I used my medium scallop border die to cut out the red strip and used some red patterned paper and the pennant die to create the corner detail.
I hope you'll play along with this week's sketch and link your creation on Karen's blog. Now it's time to hop around and see what the rest of the Sweet Sunday Stampers created.
Dana White
Jen Tapler
Lynn Put
Sarah-Jane Kalé
Vicki Burdick
and Karen Giron
Here are the dies I used:
Thanks for stopping by!
Karen
Sunday, October 16, 2011
Friday, October 14, 2011
Take Off, eh!
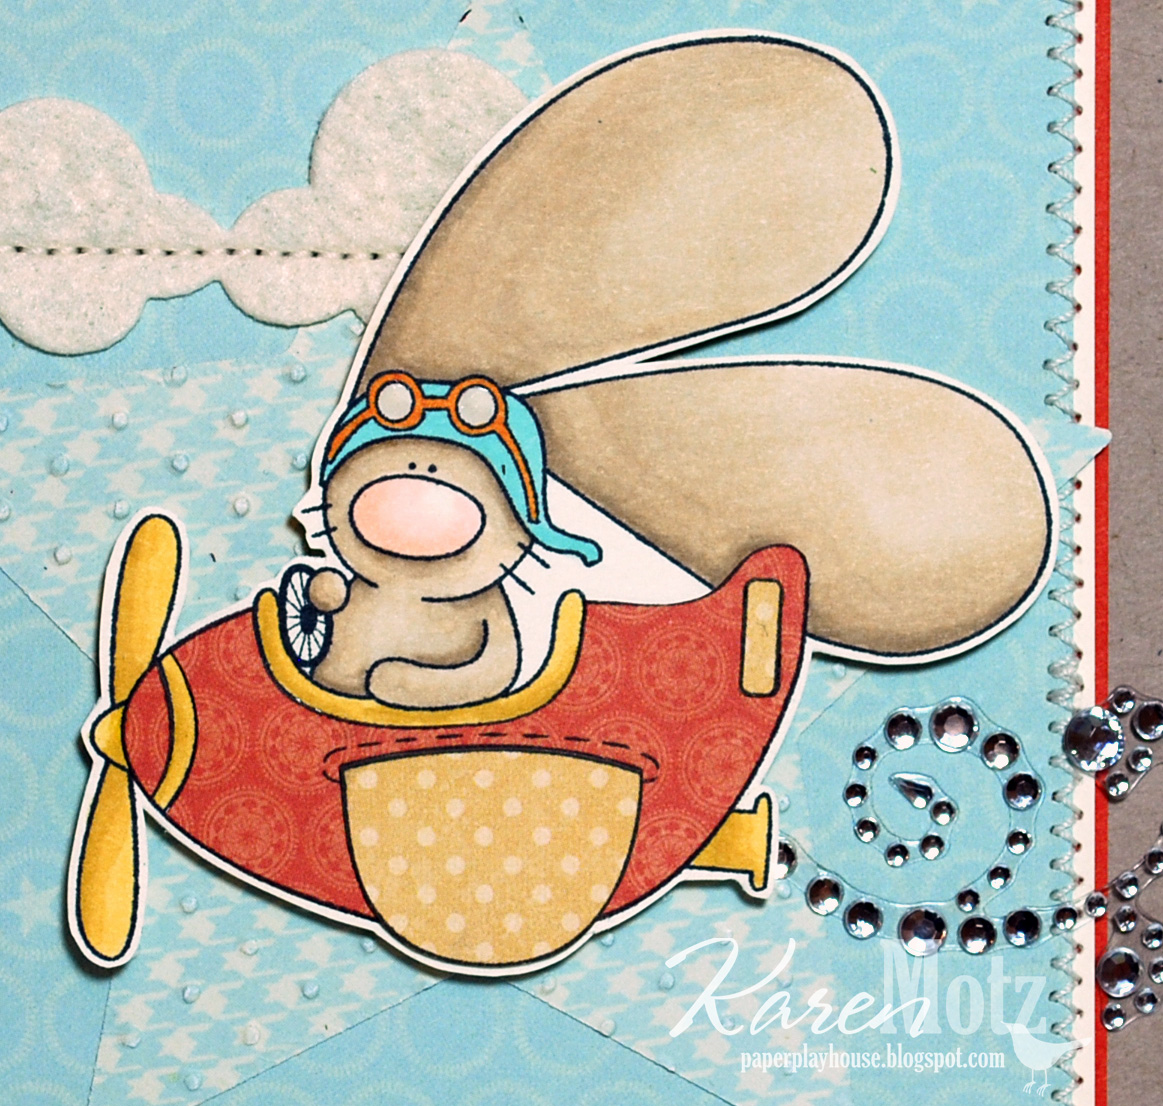
I've had this Take Off set from The Cat's Pajamas since it was released and it had yet to see any ink, so I pulled it out and played along with the TCP Tuesday sketch challenge, TCPTUES180.
The sketch was a little intimidating with that big 'ole star, but I just treated it like any other layer and I love how my card came together. This little guy is SO cute!!! I love that his ears are practically bigger than the plane!
I stamped the image with Memento Tuxedo Black onto choice buttercream and coloured it with copics. I paper pieced the airplane with two patterns from the Blink of an Eye collection by My Mind's Eye. I added a couple coats of clear glaze pen to his goggles and a rhinestone swirl coming out of the exhaust pipe. I cut out the row of clouds using the cloud border die then stitched them in place. I gotta say, my little Janome Sew Mini did not like going through that many layers of card stock! LOL!
Thanks for stopping by!
Karen
Wednesday, October 12, 2011
Someone You Love {MFTWSC41}
It's time to get sketchy with the MFT Wednesday Stamp Club and sketch 41.
I needed a sympathy card recently so I reached for my Clearly Sentimental about Sympathy set. This is definitely a must-have set. It's one you hope you never have to use, but it has the most beautiful sentiments when you do need to use it.
I kept the colour palette soft and use patterned paper from the Lost & Found Market Street paper pad. I used several die-namics to add detail: layered labels (for the sentiment), mini rolled roses, and faux crochet border.
I added another sentiment on the inside and a couple of hearts cut out with the hearts a plenty and notched tag die-namics.
Here are all the sketchy details:
Here are the die-namics I used:
Thanks for stopping by!
Karen
I needed a sympathy card recently so I reached for my Clearly Sentimental about Sympathy set. This is definitely a must-have set. It's one you hope you never have to use, but it has the most beautiful sentiments when you do need to use it.
I kept the colour palette soft and use patterned paper from the Lost & Found Market Street paper pad. I used several die-namics to add detail: layered labels (for the sentiment), mini rolled roses, and faux crochet border.
I added another sentiment on the inside and a couple of hearts cut out with the hearts a plenty and notched tag die-namics.
Here are all the sketchy details:
There's a prize each week for one participant, chosen at random. You may use any stamps and supplies that you wish. Each week a keyword is assigned to the sketch, and this week's keyword is MFTWSC41. All you need to do to enter is upload your card to the gallery at Splitcoast and enter the given keyword in the keyword box during the upload process. After the deadline (noon Eastern on Tuesday) we randomly choose a winner from that week's entries and the winner will receive a $15 gift voucher. If the winning card uses MFT stamps, the participant will earn a $5 bonus, for a total of a $20 gift voucher!
Be sure to head over to Kim's Blog to view the entire list of design team participants...there's plenty of inspiration for you with today’s sketch!
Here are the die-namics I used:
Thanks for stopping by!
Karen
Monday, October 10, 2011
MFT Creative Challenge - Be Negative
Say what? Be negative? No way...I'm little Miss Positive. In fact I'm known for finding the silver lining in just about everything. But just this once I'll concede and "be negative" just for this challenge.
In 2011, MFT is working harder than ever to inspire you, and we have come up with something we think you'll really enjoy. Our Design Team Creative Challenge is a new monthly feature, where we challenge our design team to explore their creative side using a specific theme, product or technique. This month, we're going to "be negative." Our designers will show you what you can do with the negative space after you cut out your Die-namics, or the other half of patterned paper, cardstock or felt that is leftover when you're done with your Die-namics! Visit Kim's Blog to see exactly what we've been up to, you'll find a full list of designers that have taken up the challenge!
I made a sweet little card with Pure Innocence Pumpkin Patch Girl and I used the negative space of four different die-namics dies: flat-bottom cloud, fresh cut grass, postage border, and file tab. The patterned papers are from the Away We Go collection by My Mind's Eye.
I've taken a few close ups to show you the detail in the cut out pieces. I wanted the cloud to have some texture so I used my swiss dots embossing folder on the cream card stock behind the cut out cloud. The brown strip is the negative part left over from cutting out the postage border die-namic (I had saved it from an earlier project). The grass at the bottom is the negative part of the fresh cut grass die-namic...sweet!
I cut the file tab out of the polka dot paper and used the negative space on the front of my card, then I used the actual tab on the inside.
Have fun looking at your die-namics in a whole new light, and add a little negativity in your crafting life once in a while! LOL!!
Here are the die-namics I used:
Thanks for stopping by!
Karen
Sunday, October 9, 2011
Sweet Sunday Birthday Wishes
It's time for this week's Sweet Sunday Sketch Challenge, SSSC138.
This is a fun sketch so don't let it scare you away. When I first saw the sketch I wondered how I'd figure out the proper width of the diagonal panels. Then I remembered a great tip from Jen Tapler. Open the file in Photoshop Elements, resize it to the size of a card (4.25 x 5.5) and print. Then just use a ruler to measure the width of the panels...presto...the three middle panels on my card are strips of paper that measure 1 5/8" wide. Thanks Jen!
Once I was able to look beyond those angled panels, I knew this was the perfect sketch for the birthday cards I needed to make for my brothers' (twins) birthday. I used the It's Your Birthday à la carte stamp from Taylored Expressions...simple, quick and masculine!
It's been so long since I made a masculine card that I had to dig to the back of my patterned papers to find the manly patterns. I ended up choosing two collections from the My Mind's Eye Lime Twist line, Fly a Kite and Out of the Blue. As I chose the papers to work with I realized they contained nearly all the same colours, which allowed me to colour the image with exactly the same copic markers for both cards...sweet! Then I gave the letters two coats of clear glaze pen to gloss them up.
Plenty of stitching and the star border die give just the right amount of detail to the background piece. I added yellow ribbon under the green star die cut so the stars in the center would be yellow and not show the different patterned papers.
I hope you'll play along with this week's sketch and link your creation on Karen's blog. Now it's time to hop around to the rest of the Sweet Sunday Stampers and see what they came up with!
Dana White
Jen Tapler
Lynn Put
Sarah-Jane Kalé
Vicki Burdick
and Karen Giron
Here's the die I used:
Thanks for stopping by!
Karen
Thursday, October 6, 2011
Taylored Expressions Release Day!
TE Release Day!
- All of the new products are now available for purchase! Check out the Fresh Out of the Oven Department to see everything in one place!
- More projects from the Baker's Dozen to inspire you. Just follow the link list below.
- Did you win one of the Mystery Baker's Dozen Blog Giveaways? Find the list of winners on Taylor's Blog.
- October is Breast Cancer Awareness Month - you can help support the Susan G. Komen Foundation through the purchase of Moka Hope (insert direct link to stamp set). Plus you can donate cards to the UT MD Anderson Cancer Center through Hope You Can Cling to at SCS.
Today you're going to see a recap of all the sets the Baker's Dozen has been previewing the past three days, and it's going to be a FUN recap because the sets are all so adorable!
I worked with Woodland Winter again and used supplies from the 12 Days Project Pantry, along with the Trim the Tree dies. I adore the little critters in this set and decided to use the raccoon. He cracks me up holding that little candy cane, and with his raccoon mask it makes me think he's going to steal the present under the tree or maybe beat it open like a piñata. LOL!!!
The images are stamped with Memento Tuxedo Black and coloured with copics, except the tree which is all done with patterned paper thanks to the Trim the Tree dies. I added sparkle to the candy cane and the red bow with red and green Spica glitter pens. Oh, and I gave the raccoon some dimension by popping his head up on foam tape. I used my swirls impression plate on the patterned paper behind the tree to add a little texture the added some rhinestones to decorate the tree. The small scallop border die was perfect to cut out the green strip just below the ribbon. The layout is Jen's October Sketch For You To Try.
Before you head off to Taylored Expressions fill your shopping cart, be sure to hop over to the rest of the Baker's Dozen blogs for more inspiring projects.
- Danielle Lounds
- Jami Sibley
- Jen Shults
- Jodi Collins
- Karen Giron
- Melissa Sauls
- Melody Rupple
- Nancy McKinney
- Regina Mangum
- Sankari Wegman
- Taylor VanBruggen
- Tori Wild
- Wanda Guess
Here are the dies I used:
This card brings my Project Christmas 2011 card total to 23. Yipee!
Thanks for stopping by!
Karen
Wednesday, October 5, 2011
Happy Thoughts {MFTWSC40}
It's time to get sketchy with the MFT Wednesday Stamp Club and sketch #40. Wow, sketch 40 eh? That means there's only 12 weeks until the new year, or 11 weeks until Christmas!!! Yikes!!
Well, my card today says nothing about winter because I used the new Pure Innocence Calendula set with the pretty flower.
Her dress was perfect for paper piecing with two different patterned papers. There was a lot of intricate cutting, but it was definitely worth it. The patterned papers are from the Vanity Flair collection by My Mind's Eye.
I used the larger of my open scallop doily duo to cut out the green circle then used the small scallop border die-namic for the orange strip below the ribbon. The ticket tab die-namic was perfect for the sentiment.
Here are all the sketchy details:
Here are the die-namics I used:
Thanks for stopping by!
Karen
Well, my card today says nothing about winter because I used the new Pure Innocence Calendula set with the pretty flower.
Her dress was perfect for paper piecing with two different patterned papers. There was a lot of intricate cutting, but it was definitely worth it. The patterned papers are from the Vanity Flair collection by My Mind's Eye.
I used the larger of my open scallop doily duo to cut out the green circle then used the small scallop border die-namic for the orange strip below the ribbon. The ticket tab die-namic was perfect for the sentiment.
Here are all the sketchy details:
There's a prize each week for one participant, chosen at random. You may use any stamps and supplies that you wish. Each week a keyword is assigned to the sketch, and this week's keyword is MFTWSC40. All you need to do to enter is upload your card to the gallery at Splitcoast and enter the given keyword in the keyword box during the upload process. After the deadline (noon Eastern on Tuesday) we randomly choose a winner from that week's entries and the winner will receive a $15 gift voucher. If the winning card uses MFT stamps, the participant will earn a $5 bonus, for a total of a $20 gift voucher!
Be sure to head over to Kim's Blog to view the entire list of design team participants...there's plenty of inspiration for you with today’s sketch!
Here are the die-namics I used:
Thanks for stopping by!
Karen
Taylored Expressions Sneak Peeks Day 3!
October Release At a Glance
- We have sneak peeks to share Monday through Wednesday. All of the new products will be available for purchase on Thursday, October 6th at 8 am PST. You'll find it all in the Fresh out of the OvenDepartment at the Taylored Expressions Store.
- Join us as a fan on Facebook for an early peek at the stamp sets, as well as a SPECIAL Facebook GIVEAWAY, on Wednesday night beginning at approximately 6 pm PST.
- Mystery Baker's Dozen Blog Giveaway: Each day, one lucky blog commenter will be chosen by random draw to win a $10 TE Gift Certificate. Winners will be chosen from a different Baker's Dozen blog each day and will be announced on Taylor's blog on Release Day! Be sure to hop around to see all the sneak peeks and leave comments on each and every blog for more chances to win. Limit one comment per blog per day, please. Comments close Wednesday 10/5 at 7pm PST for the drawings.
Today the Baker's Dozen is sharing samples created using Wreaths of Joy, and the set I used, Glad Tidings.
Glad Tidings is illustrated by Doug Applegate for the Apple Doodle Ink collection and is a mini set on a sturdy 4.75" square full colour storage panel. There are 10 images for just $12.95. This is an adorable nativity set that allows you to build your own scene and combine it with animals from other sets in the Apple Doodle Ink collection.
I stamped the image with Memento Tuxedo Black and coloured it with copics before cutting it out with rectangle Nestabilities. I paired the image with another new set, Banner Holiday, which is a perfect holiday sentiment set that coordinates with the popular Banner Day 1, 2, &3 sets. Banner Holiday is designed and illustrated by Taylor for the *te* collection. It's a mini set of 15 holiday sentiments for just $12.95. The banner day 3 die was perfect for cutting out the sentiment and I used the small scallop border die to cut out the green strip.
All the papers are from the Holiday Wonder Project Pantry. When you want to bake up a yummy dessert you head to your pantry for the ingredients. When you want to create a sweet papercrafting project, you can head to our Project Pantry for all the coordinating elements. We've found that some of the best cake and cookie recipes are the ones based around a basic batter or dough recipe with lots of options to spice it up according to your tastes. Taylored Expressions is offering our Basic Recipe Kit along with optional Spice It Up Ingredients that you can pick and choose from to build the kit just the way you want it.
The Holiday Wonder Project Pantry Basic Recipe Kit is $11.95 and includes:
Authentique Wonder 6x6 pad
10 sheets of 8.5" x 11" cardstock in coordinating colors
6 yards of ribbon (2 yards each of 3 different styles)
Optional Spice it Up Ingredients (choose any or all) are:
- Decorative Brad Mix
- Red/Green Paper Roses
- Christmas Glitter Assortment
- Red Pearls
- Coordinating Copic Markers
- Additional Cardstock Pack
- Additional Ribbon Bundle
Here are the dies I used:
Now it's time to hop around to see what the rest of the Baker's Dozen created.
- Charmaine Ikach
- Danielle Lounds
- Jami Sibley
- Jen Shults
- Jodi Collins
- Karen Giron
- Melissa Sauls
- Melody Rupple
- Regina Mangum
- Sankari Wegman
- Taylor VanBruggen
- Tori Wild
- Wanda Guess
This is card #22 for my Project Christmas 2011. :-)
Thanks for stopping by!
Karen
Subscribe to:
Posts (Atom)