I inked up a couple of line images that I didn't get a chance to use during teasers.
I started with Pure Innocence - I Wheelie Like You and I followed Inge's tutorial in the MFT Academy again for colouring with Prismacolour Pencils on Kraft.


I started by stamping her with Memento Tuxedo Black onto Kraft card stock then I coloured her with Prismacolour Pencils. I had fun doing her "jeans" by first stamping the image again onto Berrylicious card stock. Then I used the denim stamp from Western Backgrounds with Blu Raspberry Premium Dye Ink right over the jeans. Next I cut out the jeans and adhered them over the image. I did add just a touch of shading with a grey copic marker. Also, I used a black copic multiliner and ruler to add two straight lines on the edges of the image panel.

I knew I needed a little weight on the left side of the card so I used the Border It - Mod Borders set and stamped the line image with Black Licorice Premium Dye Ink onto Whip Cream card stock. I adhered that strip under the Kraft panel and added a narrow strip of Orange Fizz.

The letters were super fun to create. I used the Bottom Line Alphabet Die-namics to cut out the letters from Berrylicious card stock then covered them with Star Dust Stickles. Once that dried I gave them a thick coating of Glossy Accents and left it to dry overnight.

Love the shine and dimension from this effect!

On the inside I used the Bicycle Die-namics to cut out the Kraft bicycle and stamped the sentiment from Pure Innocence - I Wheelie Like You using Black Licorice Premium Dye Ink. To help draw attention to the sentiment I used two images from Border It - Mod Borders stamped with Blu Raspberry Premium Dye Ink and Orange Fizz Premium Dye Ink.

**********
Up next is this sweet Happy Birthday card using the adorable Cupcake Cutie stamp set.

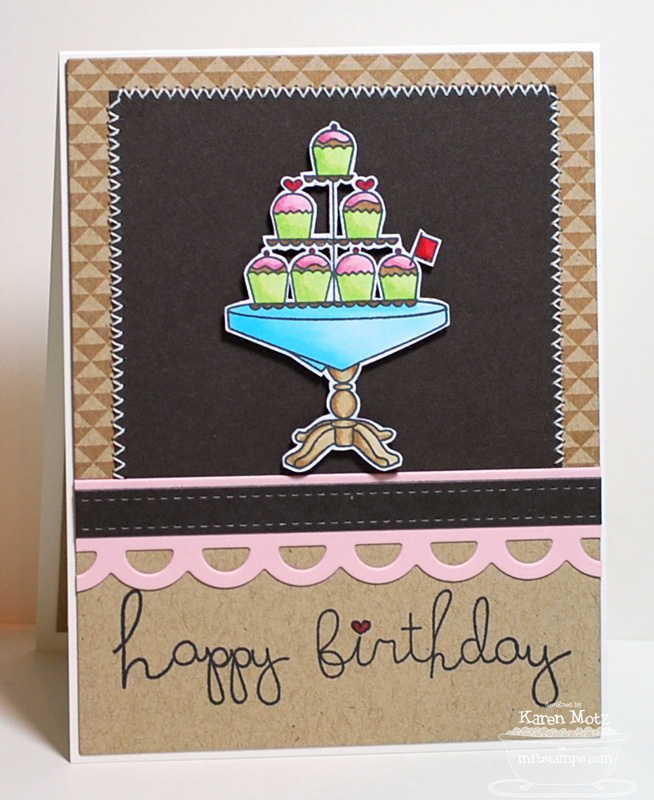
The stack of cupcakes on the table looks so delicious, I just had to ink it up. I stamped it onto X-Press It Blending Card using Memento Tuxedo Black ink and coloured it with copic markers. Then I fussy cut around the image because I knew I wanted to pop it on foam tape for dimension. I placed it onto a Hot Fudge panel so it would really stand out.

In the background I used the Border It - Mod Borders stamp set to create the triangles by stamping it with Kraft Premium Dye Ink directly onto the Kraft panel.

Along the bottom I stamped the sentiment using Black Licorice Premium Dye Ink. I should also mention that I used the Blueprints 2 Die-namics to cut out the Kraft base layer and also to cut out the Hot Fudge strip. I love that it fits perfectly inside the Open Simply Scallops Trio Die-namics, which I cut out of Pink Lemonade.

On the inside I stamped a trio of balloons (by masking the center one) and added the strings with a black copic multiliner. I stamped the sentiment from Birthday Sentiments using Hot Fudge Premium Dye Ink.


Here are the supplies I used on the Hi card:
Here are the supplies I used on the Happy Birthday card:

Thanks for stopping by!
Karen