Tuesday, January 31, 2012

MFTeaser - Let's Chat

Welcome to day one of seven fabulous days of MFT teasers!


Here are the details about the upcoming release on February 7th at 10 PM EST:
  • You can attend the New Release Party on February 7th from 8-10 PM EST HERE in the MFT forum, where you can enjoy fun, games, and PRIZES!
  • The MFT release, including all new stamp sets and Die-namics, is on February 7th at 10 PM EST.  You'll find all the newest products HERE at release time.
  • The guest designer contest is ON!  Check out the forum for details on how YOU can win $200 in stamp sets and Die-namics, and play along with the MFT Design Team for a month.
  • If you'd like to see all the teasers for today, please click on over to the MFT Blog NOW.  Be sure to leave comments as you go for the chance to win one of 2, $10 gift certificates given away daily.  The winners will be posted on February 7th just before the release party, on the MFT blog.
Today the design team is sharing samples created using Who's That Girl? - Let's Chat. She's such a tech-savvy modern girl with her iPhone...LOVE her!!!
Pin It

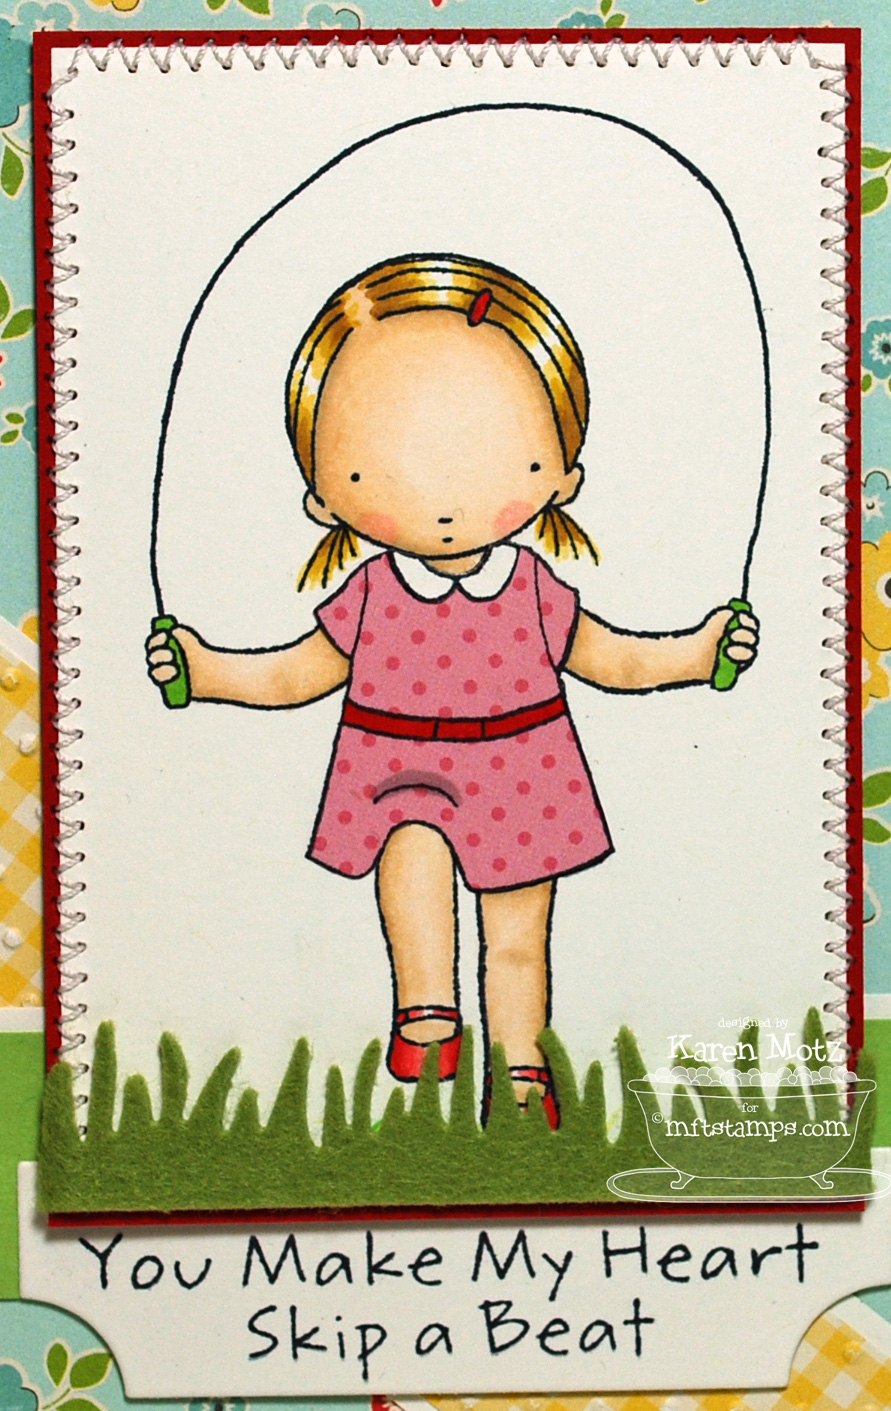
I started out using the Deconstructed Sketch DS30, but I ended up moving the image panel a little. I pulled out some new Bo Bunny Garden Girl paper and paper pieced her shirt with one of the patterns. I coloured the rest of her with copic markers and added a touch of shading on her shirt.

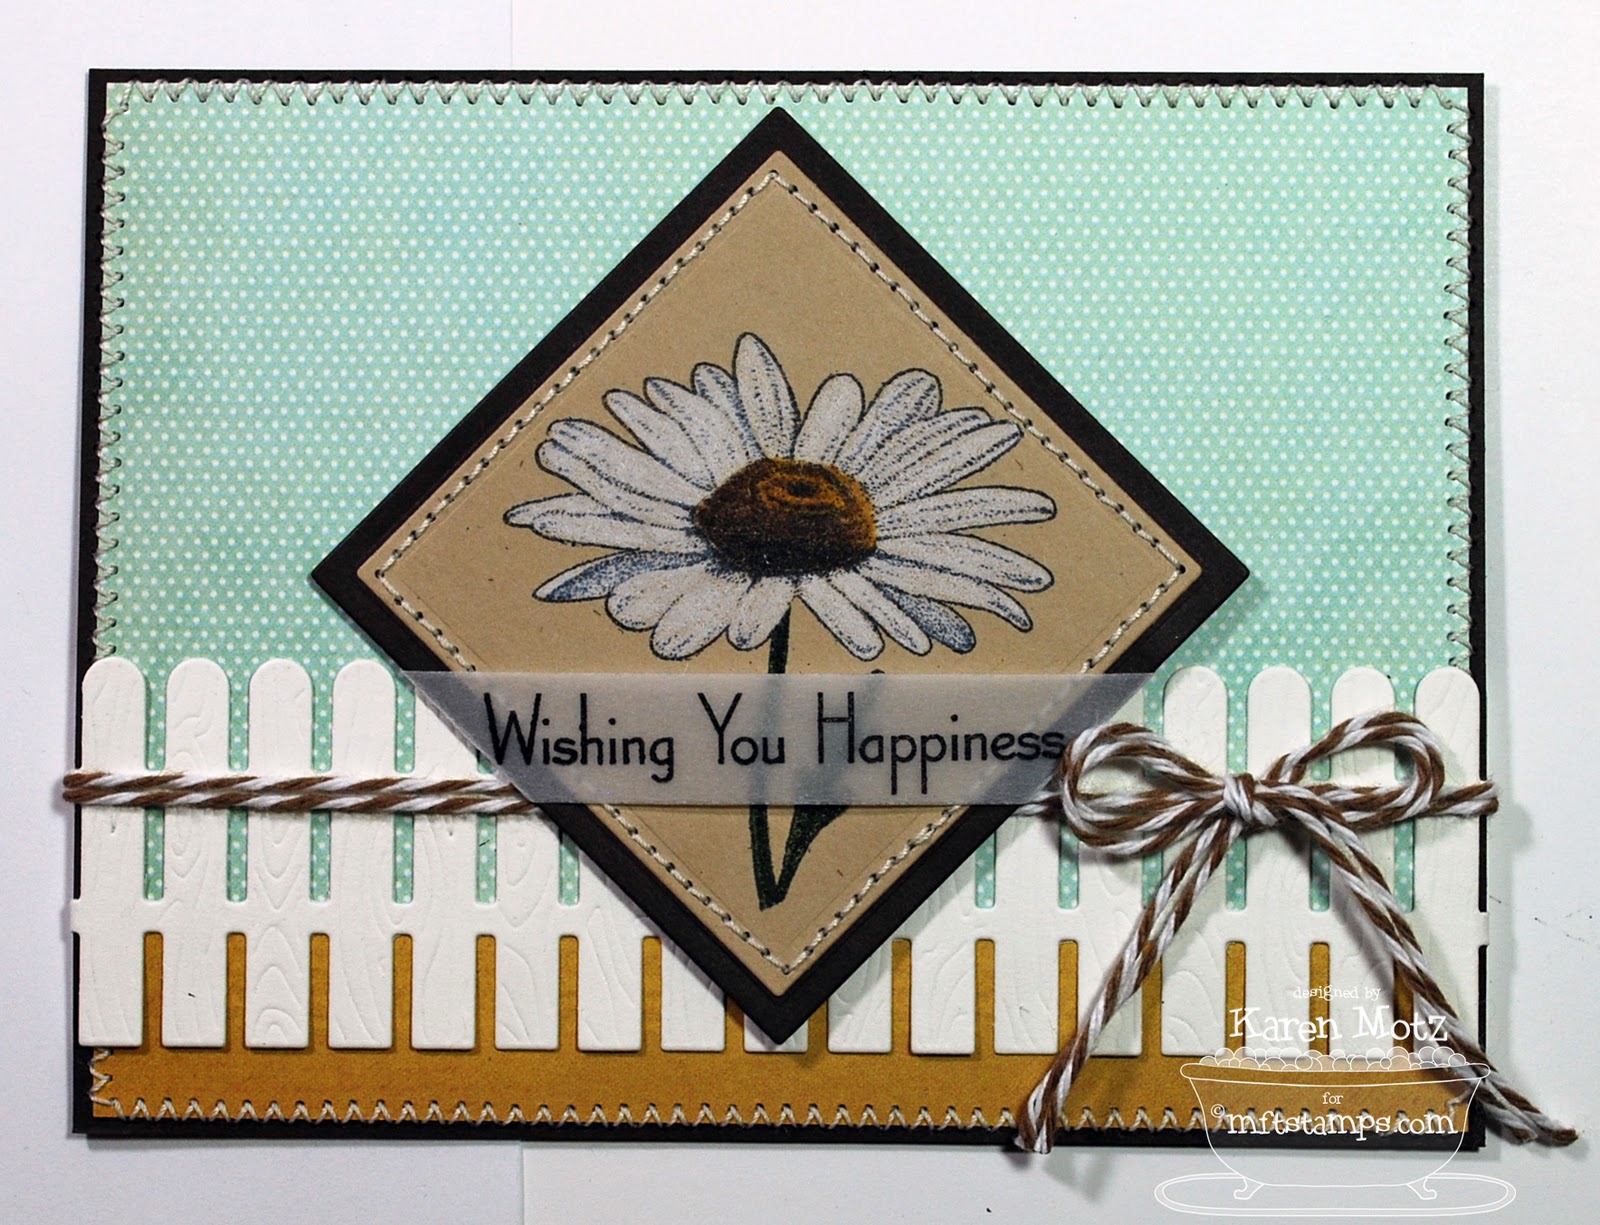
Check out the new Chat Bubbles Die-namics...swoon!!!!! I actually shortened my chat bubble a little to better fit the sentiment, and I'll show you how at the end of this post with a photo tutorial. Do you see the new Monarch Border Die-namics tucked under the flower? It's a smaller version of the jumbo monarch border Die-namics that was released last month.

I had lots of fun creating the flower embellishment using a mix of previously released Die-namics: flower and leaf trio, perfect petal trio, upsy daisy (for the leaves), and fancy flourish.

On the inside I stamped the largest sentiment from the set onto a piece of kraft card stock which I cut out with the new Oval Dainty Doily Duo Die-namics and I added a small flower for the final detail.

Photo Tutorial - Shortening a Chat Bubble:

1. Cut out the chat bubble and stamp the sentiment.

2. Use a pencil to mark where you want to cut off the chat bubble. I just eyeballed it against the die.

3. Place your card stock chat bubble back into the die, leaving the end hanging out, using your pencil mark as a guide.

4. Tape the card stock to the die so it doesn't move.

5. Run the die through your die cutting machine and back it out after the end is cut off. If you do happen to run it all the way through you run the risk of the card stock slipping in the die and possibly being ruined.

Voilà! A shortened chat bubble!!!

Here are the Die-namics I used:

Thanks for stopping by!
Karen

Monday, January 30, 2012

MFT Creative Chat - the Creative Process


It's time for the MFT Creative Chat. The My Favorite Things Design Team Creative Chat is a monthly feature, where we are challenged to explore our creative spaces and share valuable organizational methods, tools, and shopping strategies with you. You'll be able to peek into our creative spaces, ask questions, and share your own ideas in the MFT forum.  This month, we were challenged with the following:  


  • Show us your creative mind at work.  Take us on a journey through a card-making session, start to finish.
  • How do you select colors, layout, embellishments, and overall design?
  • Share your creative process with us.
Visit Kim's Blog for a full list of designers that have taken up the challenge and get ready to delve into the minds of our creative team.

Soooooooo, are you ready to delve into the depths of my stamping mind?!? It can be a scary place sometimes! LOL!!

I created a video to help you get a feel for how I work, but I also did a photo tutorial for those who prefer photos. Click HERE to watch my video on YouTube.

I made this gorgeous card using Inspired by Flowers 2 and I started out with the Card Patterns Sketch #150 for the layout. By the way, MFT is sponsoring this sketch over on the Card Patterns blog so hop over there later to play along.
Pin It

Here's a detail shot:

Photo Tutorial:

I usually start with either a sketch or a stamp set, just depending on what speaks to me. If I start with a stamp set I usually look for a sketch that works with it (because I'm so not creative when it comes to card layouts!). In this case I started with Card Patterns Sketch #150 and found a stamp set that worked with the sketch, Inspired by Flowers 2. I thought the daisy image would look nice in the diamond focal point of the sketch.

Next I chose the patterned papers. I decided to use My Mind's Eye Lost & Found Two Sunshine for this card because I think the blues and yellows worked well with the daisy image. I decided to stamp the image onto kraft card stock instead of white or cream because I wanted to use coloured pencils to colour the flower. Also, I thought the kraft card stock coordinated nicely with the patterned papers. I chose the blue polka dot patterned paper for the background...it reminds me of the sky. I layered the image onto a square of hot fudge card stock to make it pop against the blue.

Next I started working on the layers on the bottom half of the sketch. The striped lines on the sketch reminded me of a fence so I used my woodgrain fence Die-namics die to cut the fence from whip cream card stock.

Next I assembled the base layers and I added a strip of yellow patterned paper along the bottom edge then stitched the layers onto some hot fudge card stock using a zig zag stitch. I thought some cappuccino twine would make a nice accent along the fence, tied in a bow. Also, I wanted to add a sentiment so I cut out a piece of vellum using the narrow banner from the first place award ribbon Die-namics and stamped the sentiment with black staz-on ink. I envisioned the banner placed across the stem and leaf of the flower.

Once I had the twine on the card I realized the banner sentiment just wasn't going to work, so instead I wrapped the ends of the banner around the back of the image panel and created a wrapped sentiment instead of a banner. Things evolved as I created and I had to change my vision, but I think that's half the fun of creating. I added some Jody boosters on the back of the image panel to give it a little dimension.

And here's the finished card front. I just have to add a kraft card base and I'm all done!

Voilà!


Here are the Die-namics I used:

Thanks for stopping by!
Karen

Sunday, January 29, 2012

Skip a Beat

After three days of Christmas cards I've skipped right into summer with this one...pardon the pun, but I just could not resist that one!
Pin It

When I saw the Splitcoast sketch SC369 last week I knew it was perfect for Pure Innocence Jump for Joy from MFT.

I pulled out my October Afternoon Sidewalks patterned papers because the colours are just perfect for summer, and I set to work paper piecing her dress. I coloured the rest of her with copic markers...still working on the hair but I'm really liking the result today! I needed to "ground" her a little and I thought the fresh cut grass Die-namics was a good choice, so I cut it out of sour apple felt.

I needed a little space for the sentiment so I stamped it on the ticket tab Die-namics and tucked it under the image panel. You know when a card just makes you smile? Well this one does that for me. :-)

Here are the Die-namics I used:

Thanks for stopping by!
Karen

Sweet Sunday Snow Day

It's time for this week's Sweet Sunday Sketch Challenge, SSSC151.

There are plenty of fun, seasonal images I could have chosen to use, but I decided to use the wintery Pure Innocence Snow Day set from MFT, and create card #6 for Project Christmas 2012. I don't know why, but I really enjoy using the Sweet Sunday Sketches for my Christmas cards throughout the year.
Pin It

I went totally girly with a pink and red colour combination. I added some pink rhinestones for her buttons and white liquid appliqué for the fur trim and pompoms.

The patterned paper is from My Mind's Eye Be Merry 6x6 paper pad and I cut out a cream strip with my crown border Die-namics for a decorative edge. The first place award ribbon Die-namics was perfect for the sentiment, as always, but what can I say? When something is perfect like that I use it all the time! I used the two larger sizes of snowflakes from the let it snowflake Die-namics and the bottom one is cut from strawberry ice cream felt.

I hope you'll play along with the sketch and link your creation on Karen's blog. Now it's time to hop around and see what the rest of the Sweet Sunday Stampers created.
Dana White
Jen Tapler
Lynn Put
Sarah-Jane Kalé
Vicki Burdick
Anita Madden - Guest Sweet Sunday Stamper
and Karen Giron

Here are the Die-namics I used:

Thanks for stopping by!
Karen

Friday, January 27, 2012

Happy Holidays

I have a quick card to share with you today. I've been busy working on new MFT projects for teasers which start on Wednesday, but when the Clean & Simple FTL175 sketch popped onto my computer screen yesterday I knew I could whip up something quick.

I saw snowflakes as soon as I looked at the sketch, so that's what I went with. This is card #5 for Project Christmas 2012. I know I just posted a Christmas card yesterday (and, shhhhhhhh....don't tell anyone, but I have another one for tomorrow's Sweet Sunday Sketch Challenge) but there will be weeks later in the year when I'm sure I won't have one to post, so this will help me stay on track.
Pin It

I used Clearly Sentimental about Christmas from MFT along with the let it snowflake Die-namics. I cut the larger snowflake from blue skies felt then added some silver brads for a little shine. The sentiment looks like it was cut out using the larger banner from first place award ribbon Die-namics, and it was...kind of. The banner wasn't quite long enough so what I did was I measure the width of the die (which is 3/4") and cut a strip of paper 3/4" wide. Then I stamped the sentiment. Next I lined up the strip of paper inside the die and cut the fishtail end. The important thing to remember is to tape your card stock to the die so it doesn't move, and, most important of all...don't run the die all the way through the machine! Just run it through enough to cut off the one end then back it out, otherwise you'll cut off the end of your sentiment.

Here are the Die-namics I used:

Thanks for stopping by!!
Karen

Thursday, January 26, 2012

Let it Snow

I'm back today with a Stamping Bella card for the Bellariffic Friday challenge. I'm a total sketch junkie so I'm loving that the Bella Babes have sketch challenges more often this year! Thanks girls!!!

I went with my Snowman Circle image and created card #4 for Project Christmas 2012. So far so good...I'm on track for completing one Christmas card per week all year long. Yay!
Pin It

I coloured the snowman with copic markers and added a coat of clear glaze pen to the buttons to make them shine. After I layered up all the circles I decided to bling it out with a rhinestone circle. The yellow scallop layer was cut using the open scallop doily duo Die-namics.

I stamped the "let it snow" sentiment before embossing the red layer with my snowflakes embossing folder. The patterned paper is from the Fancy Pants Saint Nick 6x6 paper pad. I love non-traditional colours for Christmas cards! I dusted off my old photo corners punch from Stampin' Up! for the corner accents and added a little bling to jazz them up.

Don't forget to hop over to Bloggabella to see all of this week's entries along with the fabulous samples from the Bella Babes. Oh, and hey, Stamping Bella gives you two chances to win with every Bellariffic Friday challenge because you can play along on Splitcoast too! Go check out their forum for details.

Thanks for stopping by!
Karen

Wednesday, January 25, 2012

Thank You {MFTWSC56}

It's time to get sketchy with the MFT Wednesday Stamp Club and sketch 56.

This is another sketch that has plenty of options, and I chose to use the sweet Pure Innocence Chrysanthemum set.

She's a little larger than the circle I wanted to use but that was easy to fix...I simply coloured her up and then cut her out. Her dress is paper pieced with one of the patterns from the My Mind's Eye Happy Go Lucky paper pads. I just love the purples in this collection.
Pin It

The circle behind her was cut out using the larger size of the dizzy doily duo Die-namics. I used the open scallop border Die-namics to cut out the white scallop strip and the sentiment is stamped on white that I cut out using the first place award ribbon Die-namics.

Here are the sketchy details:

There's a prize each week for one participant, chosen at random. You may use any stamps and supplies that you wish. Each week a keyword is assigned to the sketch, and this week's keyword is MFTWSC56. All you need to do to enter is upload your card to the gallery at Splitcoast and enter the given keyword in the keyword box during the upload process. After the deadline (noon Eastern on Tuesday) we randomly choose a winner from that week's entries and the winner will receive a $15 gift voucher. If the winning card uses MFT stamps, the participant will earn a $5 bonus, for a total of a $20 gift voucher!
Be sure to head over to Kim's Blog to view the entire list of design team participants...there's plenty of inspiration for you with today’s sketch!

Here are the Die-namics I used:

Thanks for stopping by!
Karen