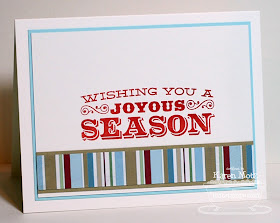
My card today features the fabulously graphic Seasonal Sentiments stamp set from My Favorite Things and the gorgeous Beautiful Bows Die-namics.
I chose fun patterned papers from the Carta Bella Merry & Bright paper pad and paired them with Sweet Tooth, Sno Cone, Sour Apple, and Razzle Berry cardstock. I used the smaller Framing Flourishes Die-namics to help anchor the sentiment panel and the Triple Scallop Border Die-namics was used to cut out the sour apple strip. The embossing folder is another new-to-me folder from Spellbinders and the layout is DS75. This is card #36 for Project Christmas 2012.
Check out this luscious Razzle Berry felt bow and the crisp sentiment. I used the new MFT Jellybean Green dye ink and it stamps beautifully!!! It gives fabulous coverage on both solid and detail images and you'll be able to add it to your collection on November 13th. Hooray for great ink!!!
Here are the supplies I used:
Thanks for stopping by!
Karen
Pages
▼
Wednesday, October 31, 2012
Tuesday, October 30, 2012
Christmas Tree {MFTWSC96}
It's time to get sketchy with the MFT Wednesday Stamp Club and sketch 96.
When I made this card last week I didn't even realize it would be posting on Halloween until I went to type up the post. Then I had a "doh" moment, so Happy Halloween and Merry Christmas!!! This is card #35 for Project Christmas 2012.
I used the fabulous new Seasonal Sentiments set, which is the current Triple Scoop set. That means you'll earn it free with a qualifying $60 order! I stamped the tree sentiment with Versamagic Red Brick onto Whip Cream cardstock then cut it out. I embossed the wide Kraft layer and left the narrow strip flat for a little contrast. The patterned paper is from the Carta Bella Winter Fun paper pack. I used my Circle 2 STAX Die-namics to cut out the little half circle at the top of the tree.
Instead of little banners I used three snowflakes. The middle snowflake was cut out using the medium size of the Let It Snowflake Die-namics from Sno Cone felt and I backed it with a Sno Cone cardstock layer for more stability. I topped it with a Whip Cream button tied with Hemp Cord. The small snowflakes were cut from Whip Cream cardstock and I topped them with clear rhinestones which I coloured with my R29 copic marker.
On the inside I stamped another sentiment from Seasonal Sentiments and added a strip of striped paper.
Here are all the sketchy details:
Be sure to head over to the MFT Blog to view the entire list of design team participants...there's plenty of inspiration for you with today’s sketch!
Here are the supplies I used:
Thanks for stopping by!
Karen
When I made this card last week I didn't even realize it would be posting on Halloween until I went to type up the post. Then I had a "doh" moment, so Happy Halloween and Merry Christmas!!! This is card #35 for Project Christmas 2012.
I used the fabulous new Seasonal Sentiments set, which is the current Triple Scoop set. That means you'll earn it free with a qualifying $60 order! I stamped the tree sentiment with Versamagic Red Brick onto Whip Cream cardstock then cut it out. I embossed the wide Kraft layer and left the narrow strip flat for a little contrast. The patterned paper is from the Carta Bella Winter Fun paper pack. I used my Circle 2 STAX Die-namics to cut out the little half circle at the top of the tree.
Instead of little banners I used three snowflakes. The middle snowflake was cut out using the medium size of the Let It Snowflake Die-namics from Sno Cone felt and I backed it with a Sno Cone cardstock layer for more stability. I topped it with a Whip Cream button tied with Hemp Cord. The small snowflakes were cut from Whip Cream cardstock and I topped them with clear rhinestones which I coloured with my R29 copic marker.
On the inside I stamped another sentiment from Seasonal Sentiments and added a strip of striped paper.
Here are all the sketchy details:
There's a prize each week for one participant, chosen at random. You may use any stamps and supplies that you wish. Each week a keyword is assigned to the sketch, and this week's keyword is MFTWSC96. All you need to do to enter is upload your card to the gallery at Splitcoast and enter the given keyword in the keyword box during the upload process. After the deadline (noon Eastern on Tuesday) we randomly choose a winner from that week's entries and the winner will receive a $15 gift voucher. If the winning card uses MFT stamps, the participant will earn a $5 bonus, for a total of a $20 gift voucher!
Here are the supplies I used:
Thanks for stopping by!
Karen
Sunday, October 28, 2012
Happy Birthday and a Loopy Hemp Cord Bow Tutorial
I'm squeezing in one more card for the month-long Hope You Can Cling To challenge over on Splitcoast. This card is for HYCCT1219, a birthday in pink.
When I saw one of the inspiration photos I knew I had pink striped patterned paper just like the wallpaper in the photo, and after a few minutes of searching I pulled out My Mind's Eye Market Street paper pad and set to work. I used CTS#1 for the layout, from the new CAS(E) this Sketch blog and went just slightly grungy by inking the edges of the patterned paper with Antique Linen and Frayed Burlap Distress Inks.
I used the Vine Border Die-namics to cut out the Kraft vine and the Flower Medley Die-namics were used to cut out the Pink Lemonade and Kraft blooms. I ran the blooms through my swiss dots embossing folder for a little texture. I topped the flower with a Pink Lemonade button and added a loopy Hemp Cord bow behind the flower. I love making these and they're easier than you might think, so I have a little photo tutorial below. I stamped the sentiment from Finishing Flourishes with Memento Tuxedo Black and stitched the layers together.
On the inside I stamped one of the sentiments from Clearly Sentimental about Birthdays.
Loopy Hemp Cord Bow tutorial:
1. Wrap a double strand of Hemp Cord around your fingers twice, using either three fingers or four fingers, depending on the size of your flower.
3. Squish the loops together in the center to form the bow.
4. Sandwich the center of the bow between two large sticky dots.
5. Adhere the bow to your card using one side of the sticky dots.
6. Adhere the flower to the other side of the sticky dots and trim the ends.
Here are the supplies I used:
Thanks for stopping by!
Karen
When I saw one of the inspiration photos I knew I had pink striped patterned paper just like the wallpaper in the photo, and after a few minutes of searching I pulled out My Mind's Eye Market Street paper pad and set to work. I used CTS#1 for the layout, from the new CAS(E) this Sketch blog and went just slightly grungy by inking the edges of the patterned paper with Antique Linen and Frayed Burlap Distress Inks.
I used the Vine Border Die-namics to cut out the Kraft vine and the Flower Medley Die-namics were used to cut out the Pink Lemonade and Kraft blooms. I ran the blooms through my swiss dots embossing folder for a little texture. I topped the flower with a Pink Lemonade button and added a loopy Hemp Cord bow behind the flower. I love making these and they're easier than you might think, so I have a little photo tutorial below. I stamped the sentiment from Finishing Flourishes with Memento Tuxedo Black and stitched the layers together.
On the inside I stamped one of the sentiments from Clearly Sentimental about Birthdays.
Loopy Hemp Cord Bow tutorial:
1. Wrap a double strand of Hemp Cord around your fingers twice, using either three fingers or four fingers, depending on the size of your flower.
2. Check the size of your loops with the flower. These look good to me.
3. Squish the loops together in the center to form the bow.
4. Sandwich the center of the bow between two large sticky dots.
5. Adhere the bow to your card using one side of the sticky dots.
6. Adhere the flower to the other side of the sticky dots and trim the ends.
Here are the supplies I used:
Thanks for stopping by!
Karen